SFTP Setup Guide
Overview
This guide walks through the one-time setup required to connect your SFTP client to Spatial Cloud. Once complete, see the SFTP Folder & Sync Reference for day-to-day file transfer guidance.
The data upload process requires a SQL Server database warehouse backup loaded to Spatial Cloud storage, along with a metadata table to automate the data update process. See the Client Data Warehouse page for detail on the warehouse and metadata table requirements.
Before you start
Before TechnologyOne can provision your SFTP access, you must supply:
- A public SSH key — generated on the machine that will make SFTP connections (instructions below)
- Your public IP address — the outbound IP from which connections will originate
Once received, TechnologyOne will provision the SFTP service and confirm it is ready for testing. Provisioning can take up to 5 business days.
Step 1 — Generate an SSH key pair
You need an SSH-2 RSA key pair of at least 2048 bits in OpenSSH format. Generate this on the machine that will connect to SFTP, then share only the public key with TechnologyOne. Never share your private key with anyone, including server administrators.
For Linux / Mac users
- Open a terminal session
- Run the following command, replacing <filename> with the path and name where the keys are to be saved, and <password> with an optional passphrase to encrypt the private key. Omit the -P option if you do not want a passphrase:
ssh-keygen -t rsa -f <filename> -P <password> - Two files are created. The file with the .pub extension is your public key — send this to TechnologyOne. The other file is your private key; store it in a secure location and do not share it.
For Windows users
To complete this process you will need access to a suitable SSH key generation application such as PuTTYgen.
- Download the PuTTYgen executable and run it
- Confirm the key type is set to SSH-2 RSA with 2048 bits — change these values if needed
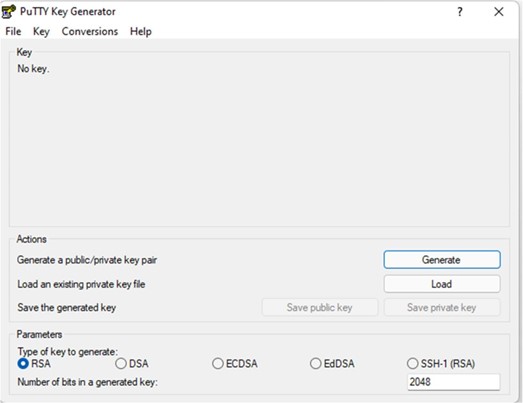
- Click Generate and move your mouse over the blank area to generate randomness
- Optionally add a comment and passphrase to the key
- Click Save public key and save the file — this is what you send to TechnologyOne
- Click Conversions > Export OpenSSH Key and save this file — this is your private key in OpenSSH RSA format, compatible with most SFTP clients. Store it securely and do not share it.
- Optionally click Save private key to also save a .ppk format copy — this is compatible with PuTTY and PSFTP specifically.
Note: The default PuTTYgen .ppk save format is not compatible with all SFTP clients. Use the Export OpenSSH Key option (step 6) for general client compatibility.
Step 2 — Install an SFTP client
Any standards-compliant SFTP client will work. TechnologyOne has no preference, but common options used by Spatial Cloud sites are:
- WinSCP — winscp.net/eng/download.php
- FileZilla — filezilla-project.org
Step 3 — Configure your connection
There are two SFTP versions in use across Spatial Cloud environments: SFTP v2 and SFTP v3. You will be advised which version applies to your environment when first deployed. If you are unsure, check your current connection details against the configurations below, or raise a support case to confirm.
SFTP v2 Configuration:
- Host name: sydsftp01.spatial.t1cloud.com
- Port Number: 22
- Username: Your customer code.
E.g. RIVERCITY - Authentication: Private key (the key that matches the public key provided to TechnologyOne)
SFTP v3 Configuration:
- Host name: <CUSTOMERCODE>.sftp.t1cloud.com
e.g. for a site named RIVERCITY: RIVERCITY.sftp.t1cloud.com. Hostname is case sensitive. - Port Number: 2022
- Username: <CUSTOMERCODE>_SPT
e.g. for a site named RIVERCITY: RIVERCITY_SPT. Username is case sensitive. - Authentication: Private key (the key that matches the public key provided to TechnologyOne)
Point your client to the private key file generated in Step 1. The connection address, username, and authentication method will also be confirmed by TechnologyOne when your service is provisioned.
WinSCP: disable timestamp preservation (SFTP v2 only)
The SFTP v2 endpoint (sydsftp01.spatial.t1cloud.com) does not support updating the timestamps of uploaded files. With default WinSCP settings this produces an error during upload:
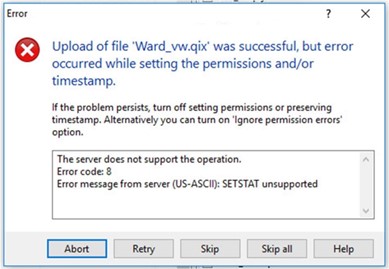
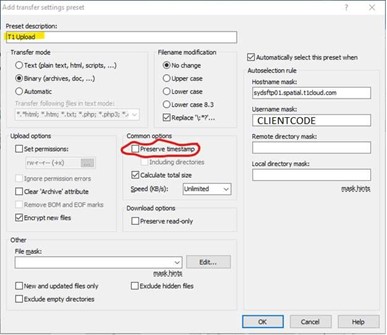
The resolution is to create a transfer settings preset for this endpoint that disables the Preserve timestamp option. This keeps the setting enabled for any other SFTP endpoints you use.
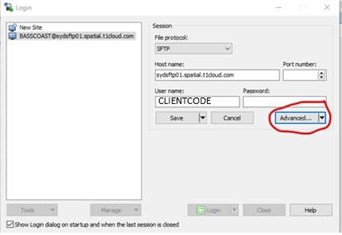
1. For the relevant WinSCP login, click the down arrow to the right of the Advanced button.
2. Select Transfer Settings Rule.
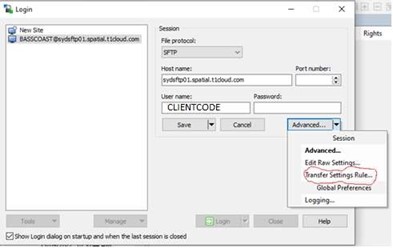
3. On the Add transfer settings preset form:
- Under Common options, uncheck Preserve timestamp
- On the right side of the form, check Automatically select this preset when
- Set Hostname mask to sydsftp01.spatial.t1cloud.com
- Set Username mask to your TechnologyOne username (normally populated automatically from your login)
- Enter a name under Preset description and click OK
WinSCP: scripting uploads
Uploads and downloads can be automated using WinSCP scripts via CMD. Refer to the WinSCP documentation for scripting examples:
https://winscp.net/eng/docs/scripts
https://winscp.net/eng/docs/script_upload_single_file